March 31, 2015

doterra lemon bliss cupcakes.


Coming up: A new recipe collaboration with doTERRA oils today!


Since I made the doTERRA peppermint brownie cake pops last week, I became mooore excited to create another recipe using doTERRA oils as my main ingredient. It has been one of my popular posts on the blog so far! Thank you so much to all of you who've been reading and even trying the recipe! Thanks to all my lovely readers... It means a lot. :)


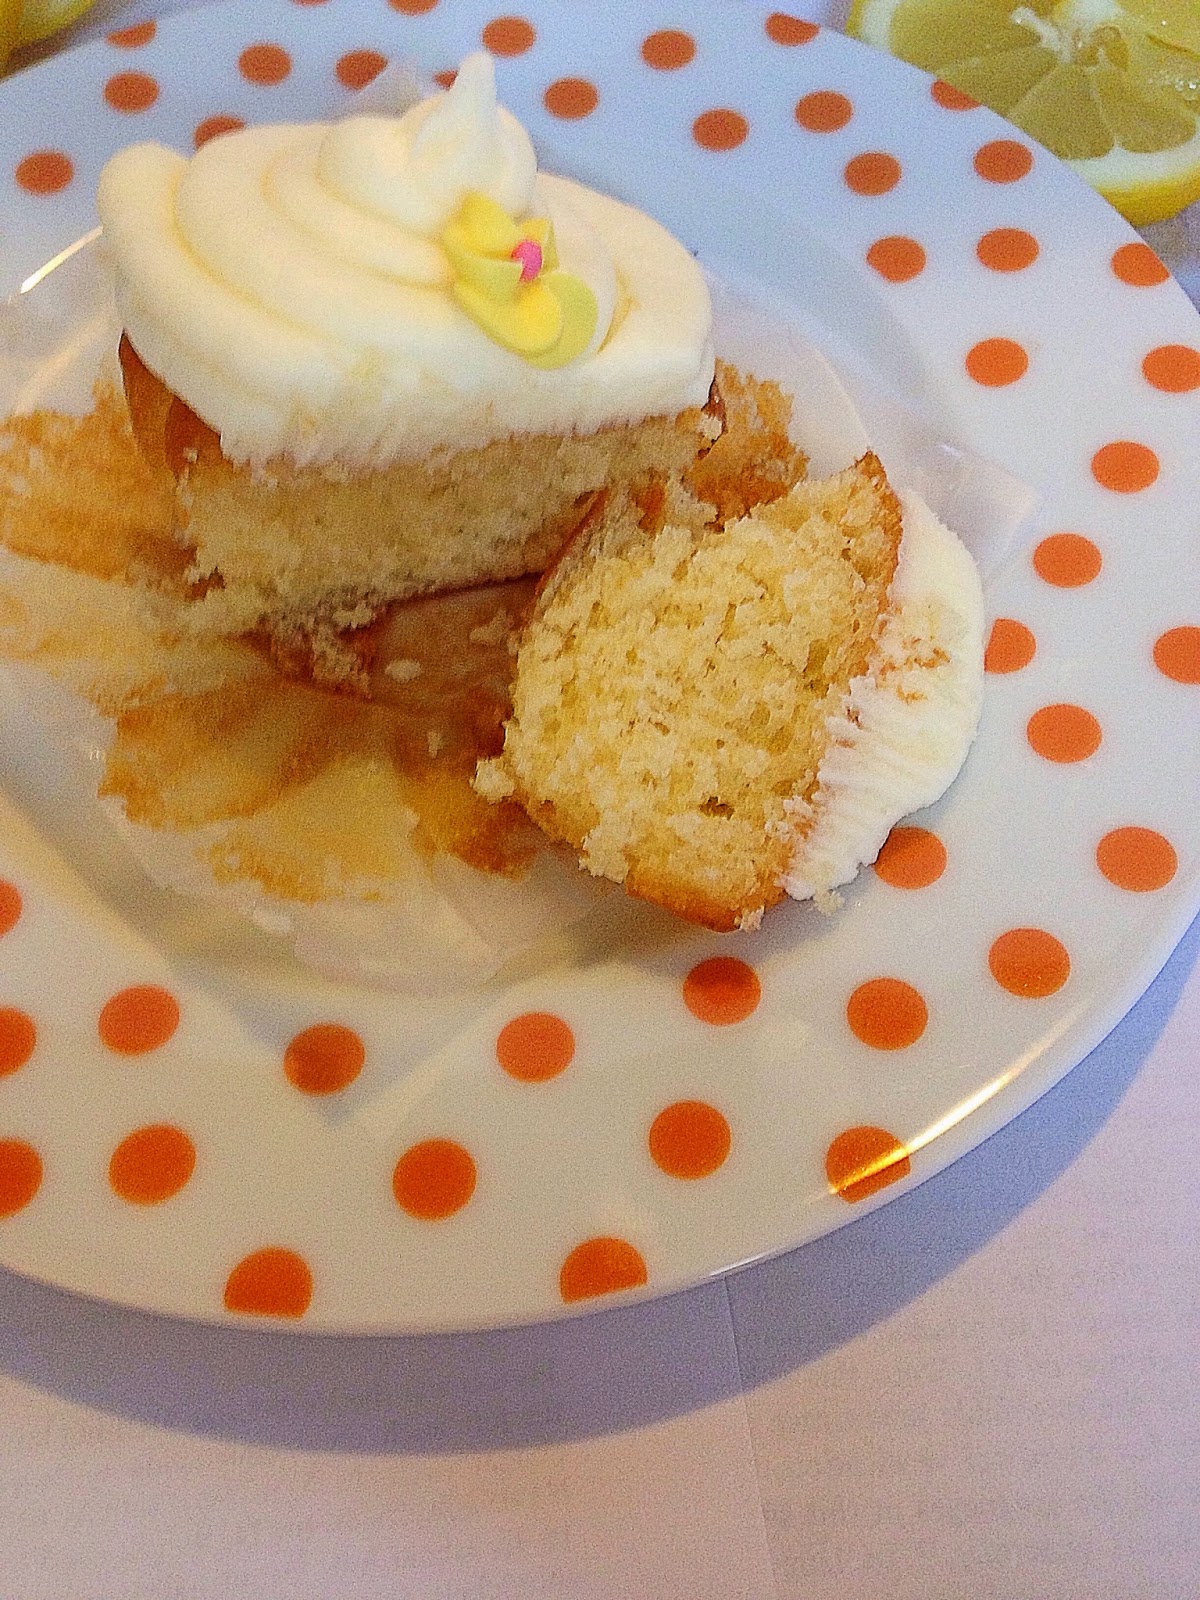
Today, after searching and developing few recipes through the internet, I'm really happy to bake these gorgeous and cute-look-yellow-decoration Lemon Bliss Cupcakes. Why yellow? Because it involves a full lemony taste in it. Not only the doTERRA extract, I also added lemon juice and grated lemon zest for the frosting.


Cupcakes frosted with this kind of stuffs is FANTASTIC. I can imagine the simple vanilla cupcakes to be frosted with so many different options, but lemon just gives you another taste. Such a refreshment! And of course, it tastes fruity too.


The cupcake itself is moist, fluffy, and not too sweet... I think the 'not-too-sweet' part is really important, because you still have the frosting later to be topped to. That's why it must be balance. And... the frosting might be the BOMB. When it finally touched your lips, it's like all lemons in every single bite. :)


One more thing, lemon makes your kitchen smell really amazing, which is how you know you add enough lemon already. So, there you have them guys!

i love this shot! :)

If you wanna give it a try, just go with this recipe! 

Making max. 12 cupcakes.

For the cupcakes:

Ingredients:

195 grams all purpose flour
200 grams granulated white sugar
1 1/2 teaspoons baking powder
1/4 teaspoon salt
113 grams unsalted butter, at room temperature, cut into small pieces
2 large eggs, room temperature
1 1/2 teaspoons pure vanilla extract
120 ml sour cream or plain yoghurt, room temperature

Directions:

1). Preheat oven to 350 degrees F (180 degrees C) and lightly butter or line 12 muffin cups with paper liners.
2). In a bowl of your electric mixer, or with a hand mixer, beat the flour, sugar, baking powder and salt until combined. 
3). Add the butter, eggs, vanilla extract and sour cream (or yoghurt). Beat the wet and dry ingredients together, at medium speed, until the batter is smooth and satiny, about 30-60 seconds. Scrap down the sides of the bowl as needed.
4). Evenly fill the muffin cups with the batter and bake for about 20-25 minutes or until lightly browned and a toothpick inserted into a cupcake comes out clean. Remove from the oven and place on a wire rack to cool.

For the lemon frosting:

Ingredients:

113 grams (1/2 cup) unsalted butter, at room temperature
330 grams (2-3 cups) confectioner/icing sugar (this really depends on how much do you like sweet! For me myself, it works wonderfully with just 330 grams or even less.)
1 teaspoon pure vanilla extract
1/4 teaspoon salt (optional)
3 tablespoons lemon juice
1 tablespoon water
4 drops of doTERRA lemon essential oils

Directions:

1). In a bowl of an electric mixer, or with a hand mixer, beat together the butter and icing sugar.
2). Gradually add the vanilla extract, salt, lemon juice, water and doTERRA lemon essential oils. Beat them until smooth and reach perfect frosting consistency.

For assembling:

Decorate the top of the cupcakes with the delicious lemon frosting, in your favourite frosting form! Then add some sprinkles, sugar candy or candy cane bits, grated lemon zest... anything. Or if you don't have enough time to decorate them and wanna stay simple, then just leave it right away. :)


Take a bite and enjoy! It's indeed a LEMON BLISS!


Have a blessed day guys!
It's might be bad weather or turbulent Tuesday in all Europe today, so stay safe and warm at home.
God bless! :)

You can find me on:


Lots of love,
@lputriasih

March 27, 2015

double nutella mille crêpe cake.


Nowadays, people are going crazy with NUTELLA!

Are you also one of those? :)

Since I've become a HUGE FAN of Nutella, seems like there's no days without Nutella. Normally, I just eat Nutella as a spread for my toast. And if I have much time, I often go with Nutella cheesecake. It's also one of my all-time favourite dessert.

Today, I just checked all my ingredients in the kitchen and what I still have are the 'basic' ingredients every baker must have! Know what? Eggs, flour, sugar and milk. With these things, I spontaneously thought that making a crêpe would be a great idea! But, since a normal Nutella crêpe is a bit mainstream, I wanna try myself to make something more challenging... Yes! The popular Nutella Mille Crêpe Cake! and even a DOUBLE one!


Making a crêpe cake isn't one difficult thing to do, only your patience which is gonna be tested. Why? Because it takes a while to make each crêpe and you have to make a lot of them! (usually ca. 10-20 crêpes). But at the end, it's all worth it! Indeed. And if your passion is still there, you won't find it too tiring as it seems. Always have fun in the kitchen! :)


This crêpe cake tastes REALLY delicious. I found myself craving for more and more! And what makes this cake even more special is the Nutella divided into two tasty parts, Nutella cream and Nutella spread. That's why I called it 'Double'. The homemade Nutella cream filled each and every layer, then the Nutella spread topped the cake together with roasted almonds. Hmm, yummy! Nutella is always a great idea and crêpe is just a simple and perfect treat for any occassions. I'm sure you and your family gonna love it as much as I do!


The form of the crêpes doesn't have to be so perfectly circle. Sometimes a-bit-messy-one can be recalled as an ART too! So, don't worry. And if you guys excited to give a try, come have a go with this recipe! It's simple and easy to follow.


Making a '10-12 crêpes' cake.

For the crêpes:

Ingredients:

130 grams all-purpose flour
1/8 teaspoon salt
25 grams granulated white sugar
2 large eggs (room temperature)
300 ml milk (room temperature)
1 teaspoon pure vanilla extract
28 grams melted butter (cooled to room temperature)

Directions:

1). In a large bowl, whisk the flour with the sugar and salt.
2). In a separate bowl, whisk the eggs and then stir in the milk, vanilla extract and melted butter. Make a well in the center of the dry ingredients, then gradually pour in the egg mixture, whisking until combined and smooth. Strain if necessary to remove any lumps.
3). Cover and let sit at room temperature about 20-30 minutes.
4). Heat a 9 inch (23 cm) non stick frying pan or crêpe pan over medium heat. Lightly butter the pan.
5). Lift the pan from the heat and, using a small ladle or scoop, pour about 3-4 tablespoons of the batter into the center of the hot pan. Tilt and swirl the pan so the batter forms an even layer (doesn't have to be a perfect circle).
6). Cook until the edges of the crêpe start to curl and the top looks almost dry (about 2 minutes). Flip the crêpe and continue to cook for about 15-30 seconds or until you have brown spots over the surface. Remove from heat and place on a plate or wire rack. Continue to cook the rest of the batter.

For the Nutella cream and assembling:

Ingredients:

1 cup heavy cream
1 tablespoon unsweetened cocoa powder
1/2 jar Nutella (at room temperature, divide use)
roasted almond, chocolate shavings, etc (optional)

Directions:

1). Pour the heavy cream into a large bowl, sift the cocoa powder into the bowl. Whip on medium speed just until firm peaks form.
2). Add the Nutella and gently fold it into the cream. It will deflate the cream a bit, so try to be gently so it keeps its volume.
3). To assemble the crêpe cake, place one crêpe on your serving plate. Top the crêpe with a spoonful of the Nutella cream, spread it out to the edges of the crepe in an even layer, then add another crêpe on top, add another spoon of cream, spread it out, and continue to stack layers of crêpes and cream until you've used all the crêpes.

A little tips: The texture of Nutella is sometimes a bit thick! And if it's too thick to spread nicely on top of the cake, microwave it briefly in 5 or 10-second increments.

4). Decorate the top with roasted almond (like I did), or you can also go with another toasted nuts, chocolate shavings, candied orange peel or anything else.
5). Chill in the fridge for 2 hours to make it easier to slice neatly. (Better slice the cake when it's well-chilled!).

It's sooo utterly delicious, hazelnutty, chocolatey... and you might feel like being in Nutella heaven!


Enjoy!
Have a great weekend everyone!

You can find me on:


Lots of love,
@lputriasih

March 24, 2015

doterra peppermint brownie cake pops.


I was blessed enough to be contacted by the lovely Courtney Brown from doTERRA few weeks ago. She sent me their essential oils which are SO GOOD, and I've proven myself about it.

I considered for a while, which food or dessert I'm going to make, because they have many different kind of tastes and each single essential oils represents the finest aromatic extracts available in the world nowadays. Few of them which I have right now are Cinnamon, Basil, Lemon, Lime, Peppermint, Wild Orange and Lavender. Those are soo popular and wellknown, aren't they? And I can tell you that just the aroma itself smells really good already. 


Finally, a great idea came up just the day before and the peppermint one is what's on my baking-list today! Peppermint always reminds me about my mom, because she really really loves it. I remember those days - everytime we go together to an ice-cream store, she always choose herself peppermint ice cream. It's just simply her favourite. So today, I created this one fun-to-make dessert: doTERRA Peppermint Brownie Cake Pops!


To make this, you need a baked brownies, few drops of peppermint extract (and I use doTERRA of course), dark  and white chocolate, lollipop sticks, and some sprinkles. I'm very satisfied with the result, especially the taste! If I should say myself, this is the best cake pops I've ever made so far. I personally looove how the peppermint, brownie and chocolate are combined together, because they made the brownie batter tastes more than just chocolatey.... It's richer in flavour.

And also the peppermint extract, what should I say? It has the best minty flavour. Minty, but not too strong, so it's really good to be mixed with the sweetness from the chocolate. I thought I kinda start being addicted to peppermint right now! Making cake pops is also really fun, especially by the decorating part. I love sprinkles, they're colourful, sweet, cute and just brought you a happier mood while baking. :)


So, if you are anything like me, you will definitely enjoy this recipe!
Have a go guys!


For the brownies:

Making an 8 inch (20 cm) square pan.

(I always hang on this recipe because this works best for me, and I always save a bit for leftovers. You may only make half-size of the recipe if you just wanna make 8-12 cake pops!).

Ingredients:

150 grams semisweet or bittersweet chocolate, chopped
113 grams unsalted butter, cut into pieces
15 grams unsweetened cocoa powder
200 grams granulated white sugar
1 teaspoon pure vanilla extract
3 large eggs
95 grams  all-purpose flour
1/4 teaspoon salt
3-4 drops doTERRA peppermint essential oils

Directions:

1). Preheat oven to 350 degrees F (180 degrees C).
2). Butter an 8 inch (20 cm) square pan, and line the bottom of the pan with parchment/wax paper.
3). Melt the chocolate and butter in a large stainless steel bowl placed over a saucepan of simmering water. Remove from heat and stir in the cocoa powder and sugar.
4). Next, whisk in the vanilla extract and eggs, one at a time, beating well after each addition. Add the doTERRA peppermint essential oils, mix well.
5). Finally, stir in the flour and salt, pour into the prepared pan and bake for about 25-30 minutes, or until a toothpick inserted in the center comes out with a little batter and a few moist clumps clinging to it. Don't over bake! 
6). Remove from oven and let it cool on a wire rack.

For the chocolate glaze, making cake pops and assembling:

Ingredients:

100 gr dark chocolate
100 gr white chocolate
lollipop sticks
sprinkles - toasted almond, sugar candy/candy cane bits, coconut shredded/flakes (optional)

Directions:

1). Crumble brownies in a large bowl, then scoop out a small amount and shape into a 1,5 inch balls. Insert the lollipop sticks through the center of each ball. Place on prepared pans, freeze for 1 hour.
2). Melt the dark and white chocolate over a simmering water or in microwave (in a microwave safe bowl at 20-30 second intervals, stirring after each 20-30 seconds, until the chocolate is completely melted. 
3). Remove the brownie balls from the freezer, dip the end of 1 stick into the melted chocolate and then directly into the center of one of the brownie balls. Sprinkle them immediately (while the chocolate covered is still wet!) with toasted almonds, crushed candy canes or sprinkles. Repeat with the remaining balls, placing balls with sticks pointing upwards, back onto the wax lined tray. 
4). Put the cake pops in the freezer once again (for 1-2 hours) or wait for all to dry completely before serving. Remember to allow coating till it completely set!


It's yummy, fudgy, chocolatey, minty, all in one bite!

And if you're interested in using doTERRA essential oils too, you can contact: courtneybrowoils@gmail.com or find more information about it here.


Enjoy!
Hope you all like this recipe!

P.S.: Thanks to everyone who's been constantly visiting my blog and even trying my recipes! It means the world to me. I still have so many baking ideas on the list, so just stay tuned! :)

You can find me on:


Lots of love,
@lputriasih

March 21, 2015

chocolate chip cookie dough squares.


Who doesn't love cookie dough batter? You whipped up a batch of cookies, tasted the batter before baking and ended up eating the whole lot. Me? Yes. I admit it. :)


I used to bake cookies a lot! One of my all time favourite is certainly chocolate chip cookies. I've also tried the oreo stuffed one... eating them by dipping in a glass of milk. I also love Snickerdoodles, Italian almond cookies, white chocolate and raspberry cookies, etc.


And now, since I found many different recipes of Chocolate Chip Cookie Dough Squares, I would like to give the recipe a try myself one of these days!


The best thing about this recipe, in my opinion, is that you'll get that cookie dough texture and flavour, chocolatey taste and sweetness from the chocolate chips and ganache, and it also requires no eggs and no bake! :)


I also have tipps if you aren't fond of chocolate chips... You can change them to pecans, almonds or coconut flakes instead. The variations are endless!


So, if you're interested enough to make this no-bake dessert, you can have a go with this recipe! It's fun to make, it's delicious, it's chocolatey and very yummy! Totally an easy-to-enjoy treat!


Making 12-16 bars (depends on the bite-sized you want).

Ingredients:

For the cookie dough filling:

1/2 cup unsalted butter, softened to room temperature
3/4 cup (150 gr) light brown sugar, packed
1 teaspoon pure vanilla extract
2 cups (250 gr) all-purpose flour
1 can sweetened condensed milk
2 cups chocolate chips

For the chocolate ganache topping:

1 cup semi-sweet chocolate chips
1/4 cup heavy cream

Directions:

1). Start by lining a 9x9-inch or 8x8-inch square pan with a sheet of parchment paper. Make sure that the edges of the paper are large enough to extend up the sides of the pan. Set aside.
2). In a bowl of a stand mixer or with hand mixer, beat together the softened butter and brown sugar until light and fluffy. It takes about 3 minutes. Then add the vanilla and mix until well combined.
3). With the mixer on a low speed, alternate adding in the flour and the sweetend condensed milk until all of it has been added and the mixture is completely blended. Fold in the chocolate chips by and until evenly blended.
4). Press the cookie dough into the prepared pan and press down to spread the dough evenly to the edges.
5). Cover the cookie dough with plastic wrap and refrigerate until set. (at least 3 hours or better overnight!).
6). In the top of a double boiler combine the chocolate chips and heavy cream for the chocolate ganache topping. Placed over the simmering water, stir often with a whisk until the chocolate is melted and incorporated into a thick sauce. Allow this to cool, but not harden.
7). Pour and spread the ganache over the top of the chilled dough and place back in te refrigeator and chill for 1 hour minimum until firm.
8). When ready to serve, carefully pull up on the edges of the parchment paper and remove the chilled cookie dough from the pan. Using a long knife, cut the dough into bite-sized squares.
9). Now serve!


Enjoy!
Have a beautiful weekend guys!

P.S.: there's a special post coming soon in the upcoming days. So, stay tuned!

You can find me on:


Lots of love,
@lputriasih

March 17, 2015

individual brownie trifles.


Three layers come together for this easy, elegant dessert. Put it in an individually wine glasses to make a beautiful presentation. 

Yes! Individual Brownie Trifles is on my baking-list today! It's a sunny day here and I was craving for something sweet... something chocolatey, something fresh and fruity. And trifles is a quick and simple dessert you just can't resist. It's indeed so fun and easy to put together and always looks splendid with gorgeous layers.


Before you make the trifles, firstly you have to make the brownies. I personally made the brownies with my normal-size recipe. I know it's a bit too much for just two glasses of trifles, but then you'll have leftover. In my thought, with leftover brownies you can create such great new ideas! :)


Actually they are endless variations of making and preparing trifles, same as making parfait dishes. Just do whatever you want, whatever you like. For example, you can change the brownies into a simple vanilla cake or coconut cake. You can also change the whipped cream layer into cheesecake layer, or chocolate/lemon pudding, etc. This time I go with brownies, fresh raspberries and whipped cream. Just playing a bit with colours. :)


If you wanna try this, then have a go with this recipe because it works! 
What's not to love about layers of chewy brownie, fresh raspberries and homemade whipped cream?? 


For the brownies (cake):

Making an 8 inch (20 cm) square pan.

Ingredients:

150 grams semisweet or bittersweet chocolate, chopped
1 stick (113 grams) unsalted butter, cut into pieces
15 grams unsweetened cocoa powder
200 grams granulated white sugar
1 teaspoon pure vanilla extract
3 large eggs
95 grams  all-purpose flour
1/4 teaspoon salt
125 grams semi-sweet chocolate chips (optional)

Directions:

1). Preheat oven to 350 degrees F (180 degrees C).
2). Butter an 8 inch (20 cm) square pan, and line the bottom of the pan with parchment/wax paper.
3). Melt the chocolate and butter in a large stainless steel bowl placed over a saucepan of simmering water. Remove from heat and stir in the cocoa powder and sugar.
4). Next, whisk in the vanilla extract and eggs, one at a time, beating well after each addition.
5). Finally, stir in the flour, salt and chocolate chips (if you use it). Pour into the prepared pan and bake for about 25-30 minutes, or until a toothpick inserted in the center comes out with a little batter and a few moist clumps clinging to it. Don't over bake! 
6). Remove from oven and let it cool on a wire rack.

For the brownie trifles:

Making 2 medium wine glasses (or 4 large parfait glasses).

Ingredients:

2/3 cup heavy cream
1 tablespoon granulated white sugar
1/4 teaspoon pure vanilla extract
fresh raspberries or dark sweet cherries, pitted
unsweetened cocoa powder
baked brownies

Directions:

1). In a large mixing bowl combine the heavy cream, sugar and vanilla. Beat with an electric mixer or hand mixer on medium speed until soft peaks form; set aside.
2). Divide half of the brownies between the wine glasses. (it's completely up to you which kind or size of glasses you choose). Divide the raspberries and whipping cream between the glasses, creating layers. Repeat layers with remaining brownies, raspberries and whipping cream. If desired, you can add melted dark chocolate after each brownie layer, or you can also top the trifles with ferrero rocher (or other brand of chocolates) or just sprinkle the top with unsweetened cocoa powder (like I did) - to make the dessert more chocolatey.
3). Serve immediately or cover and chill up to 4-5 hours.

A little tips:

Like I said before, you will still have leftover brownies! And because it's already so wonderful plain, you can easily cut a slice and eat... or serve them for dessert with a scoop of vanilla ice cream. What I've ever done before was using the brownies as topping for pancake, then serve it with chocolate sauce. Yummy! Brownies always has beautiful and moist texture and a deep chocolate flavour. So "fudgy", so "cakey" and so "chewy"!


Enjoy!
Hope you guys like it!

Have a blessed day!

You can find me on:


Lots of love,
@lputriasih

March 14, 2015

3-ingredients-oreo cheesecake truffles.


EASTER is coming soon!

I was long overdue for some sort of truffles' recipe on the blog. Last month, on Valentine's Day,
I've been thinking of making truffles... but since I was a bit busy that day, I kept this thought in my mind and planned to make it for an Easter treat! Yes, I finally made these yummy 3-Ingredients-Oreo Cheesecake Truffles!


As it's been revealed by the title, the best thing about this recipe is that you ONLY need 3 ingredients. Oreos, cream cheese and chocolate. That's enough. That's all you need. Still amazed at what you can create with just a few supplies. And the base truffle recipe couldn't be easier! :)


With an Easter celebration around the corner, these oreo cheesecake truffles would be perfect for a lovely Easter gift. This is such a great way to please your loved ones, your bestfriends or your family. Why not? :)


And to make it even more beautiful as a present, you can also decorate it in many cute ways, with candy melts (dark or semisweet or white chocolate candy melts), colourful sprinkles, sugar hearts, etc. What I've made here is just the simplest decoration of truffles - with oreo crumbs on top. Very classic, very simple, but indeed a very tasty treat.


If these truffles are tempting enough for you to have a go, here's the recipe to follow:

Making 20-25 truffles.

Ingredients:

1 package classic Oreos (ca. 36 Oreos)
8 oz. (224 grams) cream cheese, softened, at room temperature
8 ounces (227 gr) dark chocolate, melted

Directions:

1). Line a baking sheet with wax paper and set aside.
2). Using a food processor or by hand, crush all Oreos until they became fine crumbs (like Oreo-sands). Save a little bit of the crumbs for garnish later.
3). In a medium bowl, mix together crushed Oreos and cream cheese. You can mix by hand or with a wooden spatula or with hand mixer to get them combined. Dough should be smooth.
4). With the help of a small cookie scoop or by hand, scoop out dough (about 2 teaspoons) and form into balls. Place onto the prepared sheet and place in the freezer for 15-20 minutes.
5). While waiting, heat the dark chocolate in a bowl over shimmering water until completely melted.
6). Remove Oreo balls from the freezer and place one ball at a time into the melted chocolate. Using a fork, evenly coat each ball with dark chocolate. Place on the baking sheet and repeat with remaining Oreo balls.
7). While the truffles are still wet, sprinkle a little bit of the Oreo crumbles right on top of each truffle. 
8). Return truffles to the fridge or freezer for 15 minutes or until they are completely set.
9). Serve!


These Oreo Cheesecake Truffles are amazing. 
They are rich, chocolatey, creamy, all in one bite! 
Enjoy!

Have a lovely weekend guys!

You can find me on:


Lots of love,
@lputriasih

March 11, 2015

oreo-based peanut butter pie with chocolate ganache.


Since long time ago, I've always wanted to make desserts with peanut butter. I remembered as child that I really loved Skippy - a brand of peanut butter manufactured in USA. It was sooo yummy and always brings back so much memories in the past. But, since I couldn't find it here in Germany, the plan was buying another peanut butter spread, and what I found in the local market was a brand called Barney's BestI'm very happy that it tastes REALLY good. It's craveably delicious, creamy, with a texture just like Skippy (if I still clearly remembered). 

So, I'm happier that I finally created a new dessert with peanut butter.... Oreo-based Peanut Butter Pie with Chocolate Ganache. Inspiration?? Again, it came from Pinterest the day beforeI modified a few great and exciting recipes which I accidentally found there.


A little tips: If you wanna try this recipe, and you aren't a huge chocolate lover, you don't have to use the Oreo as based (just leave it with a normal graham cracker crumbs) OR drizzle the pie with ganache. (because it will make the pie so chocolatey and sweeter as taste). But, if you are indeed a chocolate lover, or even oreo lover, just make it exactly the same like I did. :)


This pie tastes delicious. I just enjoyed a huge slice for my breakfast :p and shared the rest of them with my neighbours. Have a go guys! Here's the recipe:


For the Oreo-based:

Ingredients: 

14-16 Oreos, crushed
6 tablespoons (85 grams) unsalted butter, melted

For the pie filling:

Ingredients:

1 tablespoon peanut butter spread
227 grams cream cheese, at room temperature
50 grams granulated white sugar
1 teaspoon pure vanilla extract
240 ml heavy whipping cream

Directions:

1). In a large bowl, mix together the crushed Oreos and melted butter.
2). Press onto the buttom of a well greased 8-9 inch (20-23 cm) tart pan with removable bottom. 
3). Covered with plastic wrap and place in the refrigerator to chill while you make the filling.
4). In a bowl of your electric mixer, or with a hand mixer, beat the cream cheese until smooth. 
5). Add the sugar and beat until light and fluffy. Add a spoon of peanut butter spread. Scrap down the sides of the bowl and beat in the vanilla extract. Mix all together.
6). In a clean bowl, beat the whipping cream until soft peaks form. 
7). Gradually fold the whipping cream into the cream cheese mixture. 
8). Pour the filling over the chilled oreo crust and smooth the top.
9). Cover and place in the refrigerator for at least 5 hours or better overnight.

For the chocolate ganache:

Ingredients:

227 grams semisweet or bittersweet chocolate, cut into small pieces
180 ml heavy cream
28 grams (2 tablespoons) unsalted butter

Directions:

1). Place the chopped chocolate in a medium-sized heatproof bowl. Set aside.
2). Heat the cream and butter in a small saucepan over medium heat. Bring just to a boil.
3). Immediately pour the boiling cream over the chocolate and allow to stand, without stirring, for a few minuters. Stir gently with a spoon or whisk until smooth.

Makes enough ganache to cover until one - 9 inch (23 cm) cake.

For assembling:

After the pie has been chilled overnight and completely set, remove it from the fridge. Drizzle the pie with ganache, and cut a slice.... Enjoy!


Have a lovely sunny day everyone!

You can find me on:


Lots of love,
@lputriasih

March 7, 2015

strawberry panna cotta parfaits.


I really love Panna Cotta!

I've loved it since the first time I made it in 2013. Panna Cotta is a delicious Italian dessert, made up of just a few elements - cream (and or milk), sugar and vanilla that are set with unflavored powdered gelatin. Panna Cotta has a very rich flavor and also silky smooth texture.. like a custard pudding. And you couldn't believe that it only takes a few minutes to make it! So easy and so simple. 


My mom usually make almond milk pudding at home, it's my favourite too... and Panna Cotta does taste alike. I think the texture is almost the same. But probably Panna Cotta is more creamy, smoother also and mostly served with fruit sauces (strawberry, raspberry or blueberry sauce, etc). 


Panna Cotta is one elegant dessert that looks stunning and also tastes delicious. I've talked with a friend before and he said that Panna Cotta is often served in a luxurious restaurant or hotel, and may cost a bit expensive too. But really (and honestly), it's so easy to make... and you can make it for a lil' party, even a big one, or maybe as a lovely dessert just for the delight of your family and loved ones.


If you have something big this weekend and still think about any special dessert to make, you can try this now. My Strawberry Panna Cotta Parfaits has been chilled overnight! Here's the recipe to follow:

Makes 6 individual servings (depends on what kind of dessert cups you use).

Ingredients:

1 package (7 gr) unflavored powdered gelatin
60 ml cold milk
540 ml heavy whipping cream
60 grams powdered or icing sugar
1/2 teaspoon pure vanilla extract

Directions:

1). In a small bowl, sprinkle the gelatin over the cold milk and let this mixture sit for about 5 until 10 minutes. It will soften, sell and become spongy.
2). Meanwhile, combine the cream and sugar in a medium saucepan and bring it just to a boil, stirring to dissolve the powdered sugar.
3). Once the cream is already hot, remove the saucepan from the heat and stir in the gelatin mixture. Stir until the gelatin has completely dissolved. Then stir in the vanilla extract.
4). Pour the cream into the glass and place in the refrigerator to chill for at least 4 hours, or until set (as always, better overnight!).
5). Serve with a medley of fresh strawberries and a store-bought strawberry sauce.


Enjoy!
Have a beautiful weekend everyone!

You can find me on:


Lots of love,
@lputriasih