August 29, 2015

oreo & dark chocolate muffins.


Hello everyone!

Have you tried my Nutella Swirl Banana Muffins' recipe already? Thank you for all the lovely feedback which came to me these past few days! I'm super duper happy to see that so many people are loving the recipe! :)

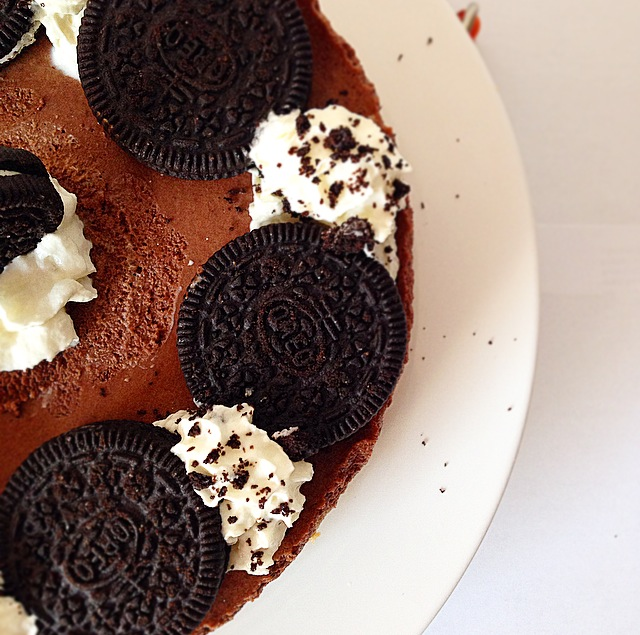
Since I couldn't get enough of muffins, I'm sharing with you today: My favourite muffin recipe of all time - Oreo & Dark Chocolate Muffins!


These are a very tasty and chocolatey dark chocolate muffin - loaded with delicious Oreos throughout. If you are a chocolate lover, or oven Oreo lover, these muffins are definitely for you.

I've baked them sooo often since a very long time, because me and my whole family simply love it the way it is. Sometimes I also send them for my best friends and loved ones, and also making them for any special occasions. The chocolate muffins are sooo moist and rich of chocolate flavour. These are as close to death by Oreo and chocolate as you will ever come! Soo delicious. Chocolate heaven!

Can't wait to devour the muffins? Let's give it a try, especially for chocolate and Oreo lovers out there! You might want to bake them again and again... Here's one great recipe to follow!


Make 12 regular sized muffins.

Ingredients:

113 grams unsalted butter, melted and cooled
2 large eggs
240 ml milk/buttermilk
2 teaspoons pure vanilla extract
230 grams all-purpose flour
60 grams unsweetened cocoa powder
250 grams light brown sugar
1 teaspoon baking powder
1 teaspoon baking soda
1/2 teaspoon salt

10-12 Oreos, chopped

Directions:

1). Preheat oven to 375 degrees F (190 degrees C).
2). In a bowl whisk together the melted butter, eggs, milk and vanilla extract.
3). In another bowl whisk together the flour, cocoa powder, sugar, baking powder, baking soda and salt. 
4). With a rubber spatula fold the wet ingredients into the dry ingredients and stir only until the ingredients are combined. Don't overmix the batter!.
5). Evenly fill the baking cups with the batter, using two spoons or an ice cream scoop. Top each with chopped Oreos.
6). Place in the oven and bake until a toothpick inserted in the center of a cupcake comes out clean, about 20-25 minutes. 
7). Transfer to a wire rack and let cool for about 5-10 minutes before removing from pan.

Enjoy!
Have a blessed weekend everyone!

sooo yummyyyy!

You can find me on:


P.S.: So excited for the US Open to start! Allez Federer!

Lots of love,
Laras

August 21, 2015

nutella swirl banana muffins.


Hi everyone!

Finally I'm back to baking after a week time! I'm incredibly happy to say that I am HOME for this summer holiday. Soooo grateful to be reunited again with my beloved family and friends. I can't do this anytime, so when the time finally arrives, I'll absolutely cherish every single moments with them.

My mom is a big fan of banana, and she loves many kind of banana desserts. That's why she requested me to bake any banana muffin, and it ended up with a combination of Banana and the always-yummy Nutella! Yes, I baked these Nutella Swirl Banana Muffins!

before baking...
loving the rainbow baking cups from Klara Form!

They are my new favourite things to bake! The texture of the muffins is so moist, light... When you remove the muffins from the oven, their golden brown crusts are delightfully crisp and although their crusts soften once covered or stored, their moist texture and sweet flavour remain intact.


I have been enjoying myself so much - baked Banana Muffins and eating them for breakfast! And it's so so so so good with a cup of tea or coffee as companion. And one more thing, you might never go wrong with Nutella too! Who can say no to Nutella???

I can't wait to bake these Muffins again soon! Because I'm craving them already. :p Let's have a go guys! I'm pretty sure you'll LOVE it! Here's one great recipe to follow!


Makes 12 regular sized muffins.

Ingredients:

230 grams all-purpose flour
150 grams granulated white sugar
1 teaspoon baking powder
1/4 teaspoon baking soda
1/4 teaspoon salt
1 teaspoon ground cinnamon
2 large eggs, lighty beaten, room temperature
113 grams unsalted butter, melted and cooled
3-4 ripe/over-ripe large bananas, mashed well
1 teaspoon pure vanilla extract

4 tablespoons Nutella, room temperature

Directions:

1). In a large bowl combine the flour, sugar, baking powder, baking soda, salt and cinnamon.
2). In a medium-sized bowl combine the mashed bananas, eggs, melted butter and vanilla.
3). With a rubber spatula or wooden spoon, lightly fold the wet ingredients (banana mixture) into the dry ingredients just until combined and the batter is thick and chunky (remember not to overmix the batter!).
4). Spoon the batter into the prepared muffin cups (for about 3/4 full). Take a teaspoon of slightly warm Nutella and pop a blob onto the center of each muffin. Use a stick or skewer to swirl the Nutella into the muffin without turning the whole thing chocolatey. (not overmix!)
5). Bake about 20-25 minutes or until a toothpick inserted in the center comes out clean.
6). Place on a wire rack to cool for 5 minutes and then remove muffins from pan.
7). Done and serve!.

Enjoy!


You can find me on:


Have a blessed day everyone!

Lots of love,
Laras

August 13, 2015

oreo cookies & cream chocolate cake.


Have you tried my Oreo Cookies & Cream Cupcakes? The recipe has been a massive hit on the blog! and I feel soo happy to see many people have really enjoyed baking them.

I'm making another Oreo dessert today! -> "Oreo Cookies & Cream Chocolate Cake". I bet this is gonna be your new favourite one. The weather is still so hot these days, even up to 38 degree Celcius... and I can't offer you any better dessert than the NO-BAKE one.


"Sometimes it's just too hot just to turn on your oven." That one phrase which I completely agree. So yes, this cake is 100% no-bake and effortlessly easy to make too. Hmm, a pretty drool-worthy dessert!.


Things you may enjoy in this cake: a crunchy and buttery biscuit base, followed by the dark chocolate filling which is soo chocolatey, creamy, rich and sweet, and the pretty finishing touches with vanilla whipped cream, some Oreos and even Oreo crumbs if you fancy to add more!.


You all know already, I always love dark chocolate better than the milk one. I used it for baking more often too. Less sweet, less sugar and healthier. It's great to have a balance in flavour. The dark chocolate was combined with more sweetness from the Oreo topping and-decoration, aaand crunchiness from the base. Perfect match, pure deliciousness!.


Craving for this already??? :p This cake absolutely made my day! :))) So, why not to try yourself making this too? Here's one great recipe to follow!


Making a 18-20 cm cake (serves 6-8 people).

For the crust:

Ingredients:

125 gr unsalted butter, melted
200 gr digestive biscuits, crushed

Directions:

1). Stir the melted butter into the crushed biscuits. Mix them with a spatula until  well combined. Tip into the tin/spring form and press down well to cover the base of the tin.
2). Chill for at least 30 minutes to allow the crust to set.

For the dark chocolate filling:

Ingredients:

300 ml heavy whipping cream
2 teaspoons powdered or icing sugar
1 teaspoon pure vanilla extract
200 gr dark chocolate, melted

Directions:

1). Pour the cream into a large bowl, then add the icing sugar and vanilla extract.
2). Whisk until the mixture forms soft peaks (1-2 minutes), then gradually whisk in the melted chocolate until the mixture thickens (take care not to over-whip the batter!).
3). Spoon the mixture into the chilled biscuit case and spread out. 
4). Cover and chill for at least 5 hours or better overnight, until the filling has completely set.

For toppings and decoration:

Ingredients:

vanilla whipped cream
Oreos
Oreo crumbs (optional)

Directions:

1). After the cake has completely set, remove from the fridge.
2). Spoon the whipped cream into a piping bag and swirl around the edge. Add some Oreos in between, sprinkle the Oreo crumbs over the swirled whipped cream and a little bit over the cake too, or you can decorate in any other way you fancy!.
3). Done and serve!.

Enjoy! Hope you like it as much or even more than I did! :)

I can't resist having this for slice after slice!
Yummyy....

You can find me on:


Have a beautiful day ahead!

Lots of love,
@lputriasih

August 8, 2015

chocolate chip cookie dough fudge.


Hiii everyone!

Remember the last time I made Chocolate Chip Cookie Dough Squares? Or that time when I made Nutella & Giotto Fudge? Today I'm fullfilling my summer dessert's craving by making Chocolate Chip Cookie Dough Fudge which is absolutely a cookie dough lover's dream!

These fudge are intensely sweet, rich, fudgy and super yummy... and you don't even have to turn on your oven to make it! It's completely NO-BAKE.


I think making Fudge is really great and fun when you're doing a Bake Sale. I have a plan to make Fudge as one of my menu too, for an upcoming baking event I will probably do on this holiday. This dessert is also a go-to favourite dessert, or a sweet snack, or after-class / after-work treat. :p Simply great!


Cookie dough + Chocolate chips = PERFECTION.

Here's one great and easy recipe to follow!


Making ca. 20-30 Fudge.

Ingredients:

For the cookie dough:

113 grams unsalted butter, room temperature
50 grams granulated white sugar
55 grams brown sugar, packed
1/2 teaspoon pure vanilla extract
1/8 teaspoon salt
2 tablespoons half and half
62,5 grams all purpose flour

For the fudge:

73 grams brown sugar, packed
75 grams unsalted butter, room temperature
a pinch of salt
80 ml half and half
500 grams powdered or icing sugar
1 teaspoon pure vanilla extract
100 grams milk chocolate chips

Directions:

1). Line an 8x8 baking dish with foil, butter or spray with non-stick cooking spray.
2). To make the cookie dough: in a large bowl, with a hand mixer, beat together the butter and sugar (white & brown sugar) until light and fluffy for about 3 minutes. Beat in the vanilla extract, salt and half and half. Stir in the flour until incorporated. Set aside.
3). To make the fudge: in a saucepan, combine the brown sugar, butter, salt and half and half. Stir over medium low heat until the butter has completely melted and the brown sugar is dissolved. Remove from the heat and slowly stir in the powdered sugar, 1 cup (125 grams) at a time, until the mixture is smooth and well combined. Stir in the vanilla extract.
4). Add the cookie dough mixture to the fudge mixture and stir them to combine. Mix in the chocolate chips.
5). Spread the mixture in the prepared baking dish. Chill in the fridge for at least 3 hours (or better overnight) until firm and completely set.
6). Remove from the fridge, then cut in squares.
7). Done and serve!.

Enjoy! Hope you guys looove it!


You can find me on:


Have a lovely weekend!

Lots of love,
@lputriasih

August 3, 2015

mini matcha green tea cupcakes.


Hello everyone! Welcome, August!
Wow... This year is flying by soo fast! Can't believe we have reached half of the year already.

Yesterday, the lovely Tina from The Happy Mail, London, sent me a sweet surprise! A box full of chocolate goodness! :)))))))


I've received some lovely colourful sprinkles, cute chocolate toppers and also mini Oreo chocolate donuts! The Happy Mail itself is an online shop - which creates and designs tailored gift packages for all occasions which are then delivered to your door or desk. There obviously doesn't have to be any specific occasion at all, they just wanna make it feel as though everyday is a celebration when these packages arrive. How sweet, aren't they!?! :)

Hmm... Today I'm cupcake-ing again! Who's craving for any yummy cupcake right now??


Baked Mini Matcha Green Tea Cupcakes! - basically classic vanilla & chocolate chip cupcakes swirled with Matcha (green tea) buttercream frosting and topped with colourful sprinkles and chocolate toppers from The Happy Mail.

Soooo delicious... and I had pretty much fun doing the photoshoot too. Everything looks so cute, colourful and lovely. Let's imagine this is a flower garden and I'm just a happy little girl who's playing around and having fun! :)


Matcha desserts are super addictive, and here's definitely one of them. You know already that I'm so into Matcha, also love their natural green colour. I love vanilla, love Matcha and always adore cupcakes in every way. So, this trio have turned out to be a great combination!

Some days, there's no better way than having homemade cupcakes on your table! So let's have a try guys... Here's one easy recipe to follow!


Making ca. 30 mini cupcakes.

For the cupcakes:

Ingredients:

195 grams all purpose flour
200 grams granulated white sugar
1 1/2 teaspoons baking powder
1/4 teaspoon salt
113 grams unsalted butter, at room temperature, cut into small pieces
2 large eggs, room temperature
1 1/2 teaspoons pure vanilla extract
120 ml sour cream or plain yoghurt, room temperature
100 grams chocolate chips

Directions:

1). Preheat oven to 350 degrees F (180 degrees C) and lightly butter or line ca. 30 mini baking cups with paper liners.
2). In a bowl of your electric mixer, or with a hand mixer, beat the flour, sugar, baking powder and salt until combined. 
3). Add the butter, eggs, vanilla extract and sour cream (or yoghurt). Beat the wet and dry ingredients together, at medium speed, until the batter is smooth and satiny, about 30-60 seconds. Scrap down the sides of the bowl as needed.
4). With a rubber spatula, carefully stir in the chocolate chips, mix well (remember not to over-mix!).
5). Evenly fill the baking cups with the batter and bake for about 10-15 minutes or until lightly browned and a toothpick inserted into a cupcake comes out clean. Remove from the oven and place on a wire rack to cool for at least 5 minutes before serving.

For the matcha frosting and assembling:

Ingredients:

226 grams unsalted butter, softened into room temperature
460 grams powdered or icing sugar
4 tablespoons milk
2 tablespoon Matcha (green tea) powder

sprinkles, chocolate toppers, etc (for decoration)

Directions:

1). In a bowl of an electric mixer or with a hand mixer, mix together the softened butter and icing sugar, blend well.
2). Add in the milk and matcha powder, beat until light and fluffy for about 3-4 minutes.
3). Spoon into a piping bag and frosting over each cupcake.
4). Sprinkle them with some colourful sprinkles and chocolate toppers, or with anything you fancy!.
5). Done and ready to serve!.

Enjoy! Hope you all like it too!

moist and delicious...!

You can find me on:


Have a lovely day!

Lots of love,
@lputriasih