Showing posts with label Tarts. Show all posts

August 13, 2015

oreo cookies & cream chocolate cake.


Have you tried my Oreo Cookies & Cream Cupcakes? The recipe has been a massive hit on the blog! and I feel soo happy to see many people have really enjoyed baking them.

I'm making another Oreo dessert today! -> "Oreo Cookies & Cream Chocolate Cake". I bet this is gonna be your new favourite one. The weather is still so hot these days, even up to 38 degree Celcius... and I can't offer you any better dessert than the NO-BAKE one.


"Sometimes it's just too hot just to turn on your oven." That one phrase which I completely agree. So yes, this cake is 100% no-bake and effortlessly easy to make too. Hmm, a pretty drool-worthy dessert!.
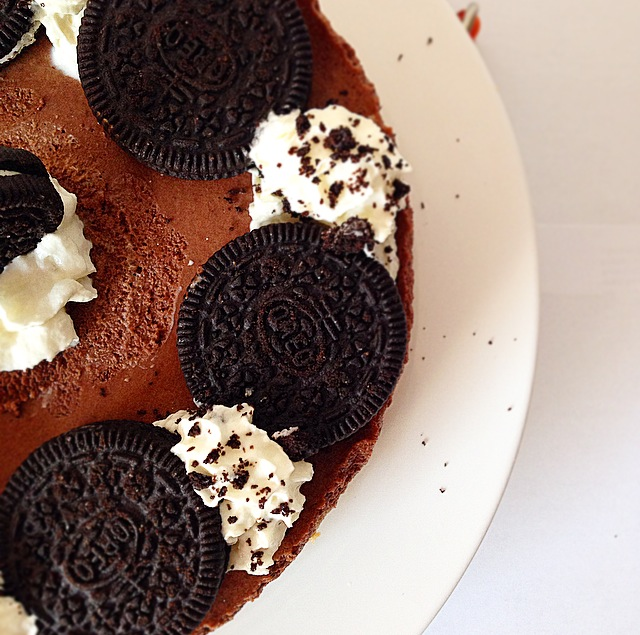

Things you may enjoy in this cake: a crunchy and buttery biscuit base, followed by the dark chocolate filling which is soo chocolatey, creamy, rich and sweet, and the pretty finishing touches with vanilla whipped cream, some Oreos and even Oreo crumbs if you fancy to add more!.


You all know already, I always love dark chocolate better than the milk one. I used it for baking more often too. Less sweet, less sugar and healthier. It's great to have a balance in flavour. The dark chocolate was combined with more sweetness from the Oreo topping and-decoration, aaand crunchiness from the base. Perfect match, pure deliciousness!.


Craving for this already??? :p This cake absolutely made my day! :))) So, why not to try yourself making this too? Here's one great recipe to follow!


Making a 18-20 cm cake (serves 6-8 people).

For the crust:

Ingredients:

125 gr unsalted butter, melted
200 gr digestive biscuits, crushed

Directions:

1). Stir the melted butter into the crushed biscuits. Mix them with a spatula until  well combined. Tip into the tin/spring form and press down well to cover the base of the tin.
2). Chill for at least 30 minutes to allow the crust to set.

For the dark chocolate filling:

Ingredients:

300 ml heavy whipping cream
2 teaspoons powdered or icing sugar
1 teaspoon pure vanilla extract
200 gr dark chocolate, melted

Directions:

1). Pour the cream into a large bowl, then add the icing sugar and vanilla extract.
2). Whisk until the mixture forms soft peaks (1-2 minutes), then gradually whisk in the melted chocolate until the mixture thickens (take care not to over-whip the batter!).
3). Spoon the mixture into the chilled biscuit case and spread out. 
4). Cover and chill for at least 5 hours or better overnight, until the filling has completely set.

For toppings and decoration:

Ingredients:

vanilla whipped cream
Oreos
Oreo crumbs (optional)

Directions:

1). After the cake has completely set, remove from the fridge.
2). Spoon the whipped cream into a piping bag and swirl around the edge. Add some Oreos in between, sprinkle the Oreo crumbs over the swirled whipped cream and a little bit over the cake too, or you can decorate in any other way you fancy!.
3). Done and serve!.

Enjoy! Hope you like it as much or even more than I did! :)

I can't resist having this for slice after slice!
Yummyy....

You can find me on:


Have a beautiful day ahead!

Lots of love,
@lputriasih

July 14, 2015

malt strawberries 'n chocolate tart.


Summer calls for another delicious and decadent dessert! 

Oh... it's actually raining at the moment and it's been raining a lot these days, but I looove it! The weather went a bit better since last week, so I'm deeply grateful. But still, it's warm... and I feel like there's nothing better than enjoying some strawberries and chocolatey desserts (again)! :p

Today, it's Malt Strawberries 'n Chocolate Tart on the table! Yummmmmy. 


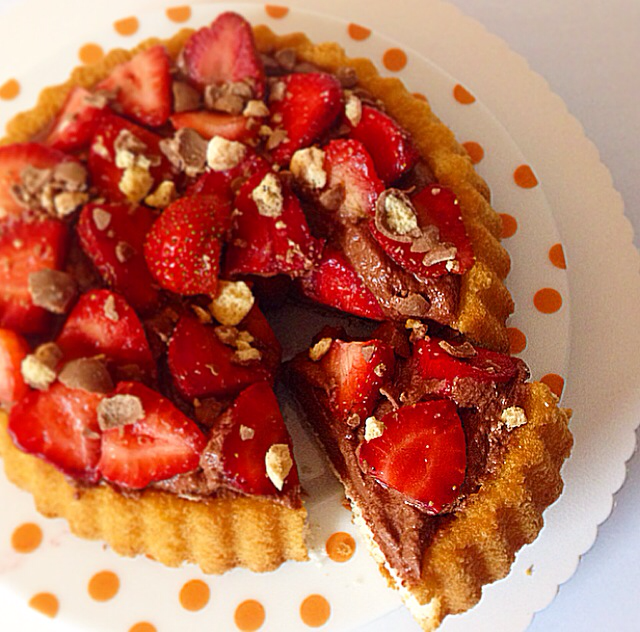
I made a white tart a.k.a vanilla sponge tart as tart-based, then made a dark chocolate filling, and as a finishing touch - for the topping, I go with some crunchy Maltesers' crumbs and fresh strawberries!


This dish is simple, classic, yet so delicious. At this time of the year, you can easily find fresh strawberries anywhere and everywhere - even at the street market. That's why strawberries always be one of the most favourite stuffs and also the best option for summery desserts. I also got the inspiration after seeing some of Jamie Oliver 's wonderful creations on his website. 

Inspirations are soo much needed before baking... don't you agree? :) and I'm happy and satistied with the result.


Strawberries have always made a great pair with chocolate! It's indeed true. But, you can always top the tart with whatever fruits you like best. Raspberries, blueberries, blackberries, orange, banana, or with some kind of nuts like almonds or hazelnuts, or with chocolate chips as well! Anything, in case it's delicious!.


Let's have a go... and just follow my easy recipe below! I would love to see you guys making this! :)


Making a 20-23 cm tart pan.

For the white "vanilla sponge" tart:

Ingredients:

1 cup granulated white sugar
1/2 cup unsalted butter, room temperature
2 large eggs, room temperature
2 teaspoons pure vanilla extract
1 1/2 cups all-purpose-flour
1 3/4 teaspoons baking powder
1/2 cup milk

Directions:

1). Preheat oven to 350 degrees F (175 degrees C). Grease and flour the prepared pan (you can use any kind or form of pan you fancy).
2). In a medium bowl, cream together the sugar and butter. Beat in the eggs, one at a time, then stir in the vanilla. Combine the flour and baking powder, add to the creamed mixture and mix it well. Finally stir in the milk until the batter is smooth. Pour the batter into the pan.
3). Bake for about 30 to 40 minutes in the preheated oven. Cake is done when it springs back to the touch.
4). Remove the cake from the oven and let it be completely cool on a wire rack (for about 20-25 minutes).

For the chocolate filling and assembling/topping:

Ingredients:

300 ml heavy cream / double cream
2 teaspoons powdered or icing sugar
1 teaspoon pure vanilla extract
200 gr dark chocolate, melted

ca. 50 gr Maltesers, crushed
fresh strawberries, sliced

Directions:

1). Pour the cream into a large bowl, then add the icing sugar and vanilla extract.
2). Whisk until the mixture forms soft peaks (1-2 minutes), then gradually whisk in the melted chocolate until the mixture thickens (take care not to over-whip the batter!).
3). Spoon the mixture into the (completely cooled) white tart and spread out. 
4). Decorate the top of the cake with Maltesers' crumbs and fresh strawberries.
5). Done and serve!.

P.S. If you want, you can chill the chocolate tart first before decorating it with the toppings (Maltesers and strawberries) for about 2-3 hours in the fridge. This might give the chocolate a nice and firm consistency. (this is optional!)

Enjoy! Hope you like it!

deliciouuusss!!!

You can find me on:


Have a blessed day!

Lots of love,
@lputriasih

April 8, 2015

no-bake oreo 'n' chocolate tartlets.


"Good things come in small packages!"

This caption says it all.


These tartlets are as chic as they are simple. The filling requires no baking, so after a few hours in the fridge (or you may also serve them right away), just slice and serve. OR, because they're indeed in mini-sizes form (that's why they're called "TARTLETS"), you can just simply take a bite! 


Oreo 'n Chocolate Tartlets! This is my first post-Easter baking. Honestly I didn't feel really well these past few days, so I'm really happy I could bake again earlier today. :)


A rich chocolate tart filling that doesn't need any baking - always be one of my readers' favourite!. Remember the last time when I made no-bake chocolate truffle tart crunch? It still remains one of the most-viewed recipes on the blog. I have no idea how the no-bake recipes and chocolate always win! :)


So, if you're also a fan of no-bake desserts, you should try yourself this one. It's so yummy, creamy, crunchy and unavoidable chocolatey. You might not miss the Oreo crunbles on top too! Oreo and chocolate always successfully make one of the best combinations, aren't they?


And last week, one of my friends told me this, "Know what? sometimes no-bake desserts are the best things in the world." - indeed!

There you go!


Making 6 mini tarts / tartlets.

For the shell:

I used a prepared tart shell which called "wiener tartlets", then I baked them once again on a cookie sheet just for a few minutes. After they're baked, remove from heat and let them cool completely! (make sure your tartlets are cool completely before you fill them with the chocolate filling).

For the chocolate filling and assembling:

Ingredients:

1 cup powdered sugar
2 tablespoons unsweetened cocoa powder
1 tablespoon unsalted butter, softened
1-2 tablespoons orange juice / milk
1/2 pack Oreos

Directions:

1). In a large bowl, with a hand mixer, combine the sugar, cocoa powder and softened unsalted butter. Mix until well incorporated.
2). Add the orange juice or milk, stir until completely blended.
3). Pour the filling into the cooled tartlets, chill them in the refrigerator for at least 2-3 hours until it completely set, or just serve them directly! (as you wish).
4). Chopped Oreos in small forms, put on the top of the chocolate fillings. 
5). Done and ready to serve!


Enjoy!
Have a blessed day everyone!

You can find me on:


Lots of love,
@lputriasih

March 11, 2015

oreo-based peanut butter pie with chocolate ganache.


Since long time ago, I've always wanted to make desserts with peanut butter. I remembered as child that I really loved Skippy - a brand of peanut butter manufactured in USA. It was sooo yummy and always brings back so much memories in the past. But, since I couldn't find it here in Germany, the plan was buying another peanut butter spread, and what I found in the local market was a brand called Barney's BestI'm very happy that it tastes REALLY good. It's craveably delicious, creamy, with a texture just like Skippy (if I still clearly remembered). 

So, I'm happier that I finally created a new dessert with peanut butter.... Oreo-based Peanut Butter Pie with Chocolate Ganache. Inspiration?? Again, it came from Pinterest the day beforeI modified a few great and exciting recipes which I accidentally found there.


A little tips: If you wanna try this recipe, and you aren't a huge chocolate lover, you don't have to use the Oreo as based (just leave it with a normal graham cracker crumbs) OR drizzle the pie with ganache. (because it will make the pie so chocolatey and sweeter as taste). But, if you are indeed a chocolate lover, or even oreo lover, just make it exactly the same like I did. :)


This pie tastes delicious. I just enjoyed a huge slice for my breakfast :p and shared the rest of them with my neighbours. Have a go guys! Here's the recipe:


For the Oreo-based:

Ingredients: 

14-16 Oreos, crushed
6 tablespoons (85 grams) unsalted butter, melted

For the pie filling:

Ingredients:

1 tablespoon peanut butter spread
227 grams cream cheese, at room temperature
50 grams granulated white sugar
1 teaspoon pure vanilla extract
240 ml heavy whipping cream

Directions:

1). In a large bowl, mix together the crushed Oreos and melted butter.
2). Press onto the buttom of a well greased 8-9 inch (20-23 cm) tart pan with removable bottom. 
3). Covered with plastic wrap and place in the refrigerator to chill while you make the filling.
4). In a bowl of your electric mixer, or with a hand mixer, beat the cream cheese until smooth. 
5). Add the sugar and beat until light and fluffy. Add a spoon of peanut butter spread. Scrap down the sides of the bowl and beat in the vanilla extract. Mix all together.
6). In a clean bowl, beat the whipping cream until soft peaks form. 
7). Gradually fold the whipping cream into the cream cheese mixture. 
8). Pour the filling over the chilled oreo crust and smooth the top.
9). Cover and place in the refrigerator for at least 5 hours or better overnight.

For the chocolate ganache:

Ingredients:

227 grams semisweet or bittersweet chocolate, cut into small pieces
180 ml heavy cream
28 grams (2 tablespoons) unsalted butter

Directions:

1). Place the chopped chocolate in a medium-sized heatproof bowl. Set aside.
2). Heat the cream and butter in a small saucepan over medium heat. Bring just to a boil.
3). Immediately pour the boiling cream over the chocolate and allow to stand, without stirring, for a few minuters. Stir gently with a spoon or whisk until smooth.

Makes enough ganache to cover until one - 9 inch (23 cm) cake.

For assembling:

After the pie has been chilled overnight and completely set, remove it from the fridge. Drizzle the pie with ganache, and cut a slice.... Enjoy!


Have a lovely sunny day everyone!

You can find me on:


Lots of love,
@lputriasih

February 28, 2015

no-bake chocolate truffle tart crunch.


We're at the end of February already! How. time. flies.
But honeslty, I feel myself soo happy because my favourite season of the year is coming soon!
Guess what? Yes, SPRING! I know it's still winter now, but at least Spring isn't too far anymore. :))))) 


So, to end my lovely February, I made something special to be shared with my neighbours later, too. It's a tart. An impressiv tart - called: No-bake Chocolate Truffle Tart Crunch.


Firstly, the idea came out after seeing some beautiful desserts on Pinterest yesterday. I just scrolled down pages after pages, seeing many yummy cakes and tarts which made me very hungry. :p Then I had a thought to modify some great recipes and it finally came up with this. 

With no baking required, guess how easy it was to make. We don't need an oven (once again), we just need to chill it in the fridge overnight. I love this tart. I love how it looks. I love how it tastes. The chocolate filling is so smooth, crumbly and chocolatey as it's seen. And the crunchiness from the base just made it even more delicious. I really love it! (if I should say so myself). Probably one of the best tart I've ever made so far.


If you decided to bake something delicious this weekend, you still have time to make this one. So, here's the recipe to follow!

Ingredients:

125 gr butter, melted
200 gr digestive biscuits, crushed
300 ml heavy cream
2 teaspoons icing sugar
vanilla extract
200 gr dark chocolate, melted
cocoa powder, for dusting
raspberries

Directions:

For the crust:

1). Stir the butter into the crushed biscuits, tip into the tin and press down well to cover the base and the sides of the tin.
2). Chill the tin for at least 30 minutes to allow the crust to set.

For the filling:

1). Pour the cream into a large bowl, then add the icing sugar and vanilla extract.
2). Whisk until the mixture forms soft peaks, then gradually whisk in the melted chocolate until the mixture thickens (take care not to over-whip!).
3). Spoon the mixture into the biscuit case and spread out. 
4). Chill for at least 5 hours or better overnight, until the filling has set.

For assembling:

Dust the top with cocoa powder before serving, then add few raspberries to make it even more beautiful! (in other way, you can also serve this tart with a scoop of vanilla ice cream... hmm, yummy!)


Enjoy!
Have a great weekend everyone!

P.S. I'm waiting for a final match between Federer and Djokovic later this evening, and I do really hope that Federer will win the trophy. #bigfan #fingerscrossed.

You can find me on:


Lots ot love,
@lputriasih