July 31, 2015

eton mess cheesecake.


A creamy no-bake cheesecake topped with fresh strawberry Eton mess!

Few days ago, I just scrolled down few summer recipes on BBC Good Food and accidentally found a great recipe of the most popular Eton Mess Cheesecake!


If you've been following my blog for some time before, you absolutely know that I looove cheesecakes. And, I usually make cheesecakes with a light cream cheese and not Mascarpone cheese. Mascarpone is clearly a bit sweeter as flavour and I usually use it for making Tiramisu or Eclair. But, this recipe of Eton Mess Cheesecake which I found, they used the Mascarpone cheese for the cheesecake filling itself. Sooo, I kinda wanna try something new and just go with it. :)


And as the result??? I LOVE IT. It ended up soo great! Some bakers also do a combination between cream cheese and Mascarpone cheese together for another option. So, it's like if you need 250 grams of cream cheese, then you made it half and half (125 grams cream cheese and 125 grams Mascarpone cheese) for the cheesecake filling. 

All cream cheese, all Mascarpone cheese, or half and half, those taste incredibly good! It all just depends on which one you fancy. If you have much time, or you just wanna practise a lil' bit more, you can try all these combinations and find out what you love the most. :)


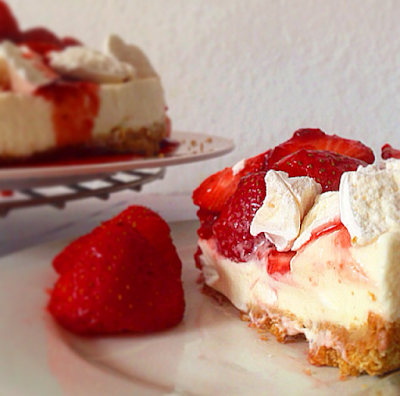
Luscious, fresh berries mixed with whipped cream, Mascarpone and crushed meringues - this cheesecake tastes amazing! So light, creamy, and also decadent with the addition of strawberry puree and meringue topping. Deliciouuss...


This is also great for any ocassion and definitely to be enjoyed by everyone who craves to try for at least a slice! Go make it to cheer the bloomy rainy days, nowadays in Europe! :p Here's the recipe to follow! 


Making a 23 cm springform or loose base tin.

(recipe adapted and slightly modified from BBC Good Food).

Ingredients:

For the cheesecake base:

70 grams digestive biscuits
30 grams ginger nut biscuits
60 grams unsalted butter, room temperature

For the cheesecake filling:

60 grams caster sugar
200 ml double cream / heavy cream
250 grams Mascarpone cheese
1 tablespoon pure vanilla extract

For the Eton mess topping:

fresh strawberries, sliced
ca. 4 meringue nests, crushed into small-medium bites
1 tablespoon icing or powdered sugar

Directions:

1). Line the tin with the clingfilm across the bottom and up the side.
2). Crush all of the biscuits together. Melt the butter and add it to the biscuits, mix well. Cover the bottom of the tin with the mixture and press firmly into the bottom. Place into the fridge until needed.
3). In a medium bowl, with a hand mixer on medium-high speed, whip the double cream until soft peak stage. In another bowl, with a hand mixer, beat together the Mascarpone cheese, caster sugar and vanilla extract. Fold in the cream until mixed thoroughly. Spread on top of the biscuit base and smooth over the top. Place in the fridge to cool for at least 6 hours or better OVERNIGHT.
4). Before serving, remove from the fridge and form its tin and place on a plate.
5). Blitz the strawberries in a food processor, then push through a sieve to remove pips. Add the icing sugar to sweeten and mix until dissolved. Slice all of the remaining strawberries and add them to the strawberry sauce/puree.
6). Crush the meringues into small and medium-sized pieces (you want it a bit chunky!) and cover the top of the cheesecake with them. Pour over the strawberries in strawberry sauce/puree.
7). Done and serve!.

Enjoy! Hope you guys like it!

one slice won't be enough!

You can find me on:


Have a beautiful weekend ahead!

Lots of love,
@lputriasih

July 23, 2015

lemon posset with raspberries.


Hi everyone!
Exams are overrr..... Yaay! Today is the last day of school, and it's officially a Summer-Break! :)

Do you still remember my 5-ingredients-pistachio panna cotta recipe? It's been a while since I made any parfait dessert. But today, I'm back to it and made something really look-alike! Guess what??? :p

Lemon Posset with Raspberries!


A dessert like this is definitely one of a kind. With ONLY 3 ingredients needed for the lemon posset itself (lemon, sugar and cream), these are soo good to be enjoyed in a hot sunny day. 

Some days, you just need a refreshment for your brain and body and this is gonna be one of the best option to be picked! They looked chic, classy and elegant, but they are really effortlessly easy to make. 


The texture of the lemon posset is sooo creamy and light (honestly I can't believe how creamy they were), and the flavour is tangy, zesty, fresh... absolutely delicious!.

If your kitchen is currently out of stock and you just wanna make a simple yet delicious one, just use the three main ingredients I have mentioned before. To make a prettier decoration - if you have much baking time, you can top the chilled lemon posset with vanilla whipped cream, some fresh berries (you may go best with raspberries or strawberries), then serve them together with some crunchy shortbread biscuits as a companion. 

Hmm... If you guys are excited enough to try this, here's one great recipe to follow! You may go addicted to many lemony desserts! :)


Making 4 little cups / ramekins/ small bowls.

Ingredients:

300 ml double cream / heavy whipping cream
zest and juice from 1 lemon
75 grams caster sugar

toppings and assembling -

vanilla whipped cream
fresh raspberries
shortbread biscuits (anything you fancy!)

Directions:

1). In a medium saucepan, place the double cream / heavy whipping cream, lemon zest and caster sugar. Bring them up to a boil and boil for ca. 3 minutes.
2). After 3 minutes, remove from the heat and gradually add the lemon juice. Sieve the mixture into a jug. Pour into 4 little cups or small bowls.
3). Chill in the fridge for at least 4 hours or overnight, until they're completely set.
4). Serve the chilled lemon posset with vanilla whipped cream, fresh raspberries (or strawberries, blueberries - any kind of berries you fancy), and some shortbread biscuits as one lovely companion. Here, I used the Biscoff biscuits.
4). Done!

Enjoy! Hope you all love it as much as I did!

"creamy texture, tangy flavour!"
deliciouuusss....

You can find me on:


Have a beautiful day and holiday as well!

Lots of love,
@lputriasih

July 18, 2015

speculoos "biscoff" cookie butter cupcakes.


Another twist on Speculoos / Biscoff Cookie Butter!

Last week, I successfully made Speculoos "Biscoff" Dark Chocolate Cake and the recipe became one of readers' favourite even till today! Thank you sooo much! I'm also really happy because the Official Twitter of Biscoff Cookies shared my recipe on their Twitter page too! Hopefully many people would have loved it as much as I did.

Today, I made the "cupcake-version" because I just think I need to share this!


I made simple, classic vanilla and chocolate cupcakes as the main batter, and combined them with Speculoos Cookie Butter Frosting which is sooo creamy, light and moussey. I also added some Biscoff Cookie Biscuits' crumbs on top, and even adding the whole Biscoff Cookie Biscuit to make a prettier decoration!.


Once you tried this, you'll really craving for the smooth, slightly spicy caramel and cinnamon flavours of the frosting! Aaaand... if you made the chocolate cupcakes, you'll absolutely enjoy the chocolatey flavour itself. Or, if you made the vanilla one, it's gonna be so classic and less sweet, but also really great to be mixed with the frosting. Both are lovely combinations. Just choose whatever you mostly like OR even make them both!.

So guys... Let's have a go! and here's one easy recipe to follow!


Making 12-14 cupcakes.

For the chocolate cupcakes:

Ingredients:

175 grams all purpose flour
50 grams Dutch-processed cocoa powder
240 ml boiling hot water
113 grams unsalted butter, room temperature
200 grams granulated white sugar
2 large eggs, room temperature
2 teaspoons pure vanilla extract
2 teaspoons baking powder
1/4 teaspoon salt

Directions:

1). Preheat oven to 375 degrees F (190 degrees C). Lightly butter, or line 12-14 baking cups with paper liners.

2). In a small bowl, stir the boiling water and cocoa powder until smooth. Let them cool to room temperature.
3). In another bowl, whisk together the flour, baking powder and salt.
3). In a medium-sized bowl, with a hand mixer, beat the butter and sugar until light and fluffy. Add the eggs, one at a time, beating until smooth. Scrape down the sides of the bowl as needed. Beat in the vanilla extract. Add the flour mixture and beat only until incorporated. Then add the cooled cocoa mixture and stir until smooth.
4). Fill each baking cup about two-thirds full with batter and bake for about 16-20 minutes, and a toothpick inserted into a cupcake comes out clean. (Do not over bake or the texture of the cupcakes will be dry).
5). Remove from the oven and place on a wire rack to cool.

For the vanilla cupcakes:

Ingredients:

195 grams all purpose flour
200 grams granulated white sugar
1 1/2 teaspoons baking powder
1/4 teaspoon salt
113 grams unsalted butter, at room temperature, cut into small pieces
2 large eggs, room temperature
1 1/2 teaspoons pure vanilla extract
120 ml sour cream or plain yoghurt, room temperature

Directions:

1). Preheat oven to 350 degrees F (180 degrees C) and lightly butter or line 12-14 baking cups with paper liners.
2). In a large bowl, with a hand mixer, beat the flour, sugar, baking powder and salt until combined. 
3). Add the butter, eggs, vanilla extract and sour cream (or yoghurt). Beat the wet and dry ingredients together, at medium speed, until the batter is smooth and satiny, about 30-60 seconds. Scrap down the sides of the bowl as needed.
4). Evenly fill the baking cups with the batter and bake for about 20-25 minutes or until lightly browned and a toothpick inserted into a cupcake comes out clean. Remove from the oven and place on a wire rack to cool.

For the Speculoos Cookie Butter frosting and assembling:

Ingredients:

200 gr unsalted butter, room temperature
600 gr powdered or icing sugar
150 gr Speculoos / Biscoff Cookie Butter
60 ml milk

Biscoff Cookie Biscuits (crushed and whole), for topping

Directions:

1). In a large bowl, with a hand mixer, beat the butter until smooth. Gradually add the icing sugar on a low speed until they are combined, then speed the mixer up to medium-high and mix again for 4-5 minutes until well combined and the texture becomes really smooth.
2). Add the Speculoos Cookie Butter and milk, then keep on beating them for ca. 5 minutes until you reach the consistency and texture you desired. (you may reduce the milk or even adding more!).
3). Pipe the frosting onto all the cupcakes. Sprinkle on some Biscoff Cookie Biscuits' crumbs, then (at last) insert a whole Biscoff Cookie Biscuit on the very top!
4). Done and serve!.

Enjoy! Hope you all enjoy the recipe!

yummmmyyyy!!

You can find me on:


Have a blessed weekend!

Lots of love,
@lputriasih

July 14, 2015

malt strawberries 'n chocolate tart.


Summer calls for another delicious and decadent dessert! 

Oh... it's actually raining at the moment and it's been raining a lot these days, but I looove it! The weather went a bit better since last week, so I'm deeply grateful. But still, it's warm... and I feel like there's nothing better than enjoying some strawberries and chocolatey desserts (again)! :p

Today, it's Malt Strawberries 'n Chocolate Tart on the table! Yummmmmy. 


I made a white tart a.k.a vanilla sponge tart as tart-based, then made a dark chocolate filling, and as a finishing touch - for the topping, I go with some crunchy Maltesers' crumbs and fresh strawberries!


This dish is simple, classic, yet so delicious. At this time of the year, you can easily find fresh strawberries anywhere and everywhere - even at the street market. That's why strawberries always be one of the most favourite stuffs and also the best option for summery desserts. I also got the inspiration after seeing some of Jamie Oliver 's wonderful creations on his website. 

Inspirations are soo much needed before baking... don't you agree? :) and I'm happy and satistied with the result.


Strawberries have always made a great pair with chocolate! It's indeed true. But, you can always top the tart with whatever fruits you like best. Raspberries, blueberries, blackberries, orange, banana, or with some kind of nuts like almonds or hazelnuts, or with chocolate chips as well! Anything, in case it's delicious!.


Let's have a go... and just follow my easy recipe below! I would love to see you guys making this! :)


Making a 20-23 cm tart pan.

For the white "vanilla sponge" tart:

Ingredients:

1 cup granulated white sugar
1/2 cup unsalted butter, room temperature
2 large eggs, room temperature
2 teaspoons pure vanilla extract
1 1/2 cups all-purpose-flour
1 3/4 teaspoons baking powder
1/2 cup milk

Directions:

1). Preheat oven to 350 degrees F (175 degrees C). Grease and flour the prepared pan (you can use any kind or form of pan you fancy).
2). In a medium bowl, cream together the sugar and butter. Beat in the eggs, one at a time, then stir in the vanilla. Combine the flour and baking powder, add to the creamed mixture and mix it well. Finally stir in the milk until the batter is smooth. Pour the batter into the pan.
3). Bake for about 30 to 40 minutes in the preheated oven. Cake is done when it springs back to the touch.
4). Remove the cake from the oven and let it be completely cool on a wire rack (for about 20-25 minutes).

For the chocolate filling and assembling/topping:

Ingredients:

300 ml heavy cream / double cream
2 teaspoons powdered or icing sugar
1 teaspoon pure vanilla extract
200 gr dark chocolate, melted

ca. 50 gr Maltesers, crushed
fresh strawberries, sliced

Directions:

1). Pour the cream into a large bowl, then add the icing sugar and vanilla extract.
2). Whisk until the mixture forms soft peaks (1-2 minutes), then gradually whisk in the melted chocolate until the mixture thickens (take care not to over-whip the batter!).
3). Spoon the mixture into the (completely cooled) white tart and spread out. 
4). Decorate the top of the cake with Maltesers' crumbs and fresh strawberries.
5). Done and serve!.

P.S. If you want, you can chill the chocolate tart first before decorating it with the toppings (Maltesers and strawberries) for about 2-3 hours in the fridge. This might give the chocolate a nice and firm consistency. (this is optional!)

Enjoy! Hope you like it!

deliciouuusss!!!

You can find me on:


Have a blessed day!

Lots of love,
@lputriasih

July 11, 2015

chocolate chunks vanilla muffins.


Hi everyone!

Finally we're on another weekend! I made a compilation of my latest bakes as an inspiration for all of you.... Probably you have something special coming up this weekend and still searching for pretty great ideas?? These could be some delicious options added to the list!  

All these recipes can be found on my Recipes Index!

By the way, I got super cute and gorgeous Watermelon Paper Plates & -Paper Cups from We Love Sundays!  


We Love Sundays is an online store and boutique partyware based in Australia. They have many beautiful products, as well the themes and categories in store! - Party Pretties (extra special details for any kind of celebration), Tutti Frutti (new fabulously fruity party; full of pretty pastels, brights and metallics), Decorations (a touch of shimmer, sparkle and colour for all celebrations), etc. They're all so good, chic, sweet and colourful! If you wanna see all of their wonderful collections, make sure you pop in to their website here

aren't they sooo cute??? :)

Today, I got the chance to do this post and am presenting my bakes using their Watermelon Paper Plates & Cups! Well, I had a pretty nice breakfast! hehe :) and to be honest, I had sooo much fun doing this photoshoot because everything just looks so cute, lovely and colourful. Ideal for Summer time!


Chocolate Chunks Vanilla Muffins! Yes, we're back into Muffins as I already made too much cupcakes lately! :p sometimes we just don't need the frosting.... :)


Loving these simple muffins. It's moist, soft and fluffysweet, rich of vanilla flavours... and it's loaded with chocolate chunks' goodness in each bite!


Sharing the love in easiest way. These muffins are so quick to make, and they ended up amazing. So, to the delight of your family, friends and loved one(s), why not baking these yummy muffins??? and they will absolutely receive them with a BIG smile. Go ahead! Here's the recipe to follow!


Makes 10-12 normal muffins.

Ingredients:

195 grams all purpose flour
200 grams granulated white sugar
1 1/2 teaspoons baking powder
1/4 teaspoon salt
113 grams unsalted butter, at room temperature, cut into small pieces
2 large eggs, room temperature
1 1/2 teaspoons pure vanilla extract
120 ml sour cream or plain yoghurt, room temperature
100 grams chocolate chunks

12 heart cupcake toppers (optional)

Directions:

1). Preheat oven to 350 degrees F (180 degrees C) and lightly butter or line 12 muffin cups with paper liners.
2). In a large bowl, with a hand mixer, beat the flour, sugar, baking powder and salt until combined. 
3). Add the butter, eggs, vanilla extract and sour cream (or yoghurt). Beat the wet and dry ingredients together, at medium speed, until the batter is smooth and satiny, about 30-60 seconds. Scrap down the sides of the bowl as needed.
4). Stir in the chocolate chunks with a rubber spatula (remember not to over-bake!). Just mix until combined.
5). Evenly fill the muffin cups with the batter and bake for about 20-25 minutes or until lightly browned and a toothpick inserted into a cupcake comes out clean. Remove from the oven and place on a wire rack to cool.
6). At last, insert the heart cupcake toppers into each muffin to create a lovely presentation. (this is completely optional!)
7). Done and serve!.

Enjoy!


Hope you guys like it!

yummmyyy....!!!

You can find me on:


P.S.: Something personal... Federer is on Wimbledon Final!! I can't believe he did it again. Yesterday's match was truly insane. Hmm, I do really hope he'll be able to get his 8th Wimby trophy tomorrow. Fingers crossed and pray!

Happy weekend!

Lots of love,
@lputriasih

July 7, 2015

3-ingredients-nutella brownies.


Hello Tuesday!

I'm just (almost) two weeks away from my Summer Break! So so so so can't waiiiit... :) And after suffering the heat wave over 40°C these past few days, I thank God because the weather is a bit better today and hopefully for the upcoming days! And even when I can't handle the heat, I'm still baking though! :)

PRINTSICLE - a great shop crafted in the United States which designed THE BEST Cookie Cutters for all bakers! All products are designed and printed on a 3D printer with corn-based PLA Bio Safe material.

special thanks to my dear Lena!

I'm sooo happy and also feel honoured to do this post and got a chance to try their Doodle Hearts Cookie Cutters - to present my Heart-shaped Nutella Brownies for today! Yaaaay. 

Seriously they have the best cookie cutters with every form you need! Arrow, Bow, Apple, Sunshine, Puppy Love, Cat Lady, Zoo Fun, Pirate Party, Florida Lovin', etc... They have everything in store! You can find all the details and more information on their Facebook Page and Twitter too! (just click on those links to visit!).


Today, I'm making a simple yet delicious and hazelnutty brownies with only 3 ingredients needed!. You just need Nutella, eggs and flour. Those are all the main ingredients you might need to prepare. The other stuffs are just an option if you have much time to do the decoration... or wanna make your brownies more delicious and also look more appetizing!.


The brownies is so moist, fudgy, hazelnutty and chewy. Making brownies is quick and quite easy as well, that's why brownies has been one of my super favourite cake to bake since the very beginning of my baking days. Hmmm.. I thought everyone must have Nutella, eggs and flour in the kitchen, don't you? :p So, if you're excited enough to have a go, just follow my recipe below. So easy!


Ingredients:

280 gr Nutella
2 large eggs, room temperature
62 gr all-purpose flour

Nutella  (more for topping, optional)
raspberries (optional)
sprinkles (optional)

Directions:

1). In a large bowl, with a hand mixer, beat the eggs together with Nutella and flour. Mix until they're all incorporated.
2). Pour the batter into a prepared pan (I used a square pan), and bake at 350°F (180°C) for about 25-30 minutes, or until a toothpick inserted in the center comes out with a little batter and a few moist clumps clinging to it. Don't over bake! 
3). Remove from the oven and let it cool on a wire rack.
4). After the brownies has cool completely, cut it in heart-form (using heart cookie cutters).
5). Pipe a few tablespoons of Nutella and spread it on the top of the brownies. Add some sprinkles and fresh raspberries right on the center. (Like I said before, this step is totally optional! You may just leave it right away or decorate it in any other way you fancy!).
6). Done and serve!.

Enjoy!


We're back into Nutella heaven...

yummmmmyy!

Have a blessed sunny day!

You can find me on:


Lots of love,
@lputriasih

July 4, 2015

speculoos "biscoff" dark chocolate cake.


Don't you just love Speculoos, or Biscoff, or Lotus? Whatever they're called... They're actually the same thing and taste incredibly delicious! I'm sooo happy to finally tried it. I might break up with Nutella a bit after this. :p

If you haven't heard about it before, Speculoos is definitely one of the best creations on earth. It's a spiced shortcrust biscuit, traditionally baked for consumption on or just before St. Nicholas' feast in the Netherlands and Belgium. The texture is very crunchy, the visual-look is slightly browned and also quite thin (the Speculoos dough doesn't rise too much). Nowadays, Speculoos has become sooo popular all over the world. 

The original Speculoos
(pic courtesy of Wikipedia)

And, as many other bakers do, they often use Speculoos as a main ingredient for baking! That's why I also wanna try myself. First, I had a chance to try the Speculoos Cookie Butter - also well known as Biscoff spread... and they have two different texture-flavours (Classic & Crunchy). What I found the most in the spread is actually a rich cinnamon flavour. Indeed so cinnamon-y! Kinda remembering me of Cinnamon Sugar Soft Pretzel from AuntieAnne's.

Speculoos Cookie Butter / Biscoff spread

Then, few days ago I tried the Speculoos biscuits one. That's what people mostly know as Biscoff biscuits or Lotus biscuits. They taste amazing too!.

Lotus / Speculoos / Biscoff biscuits

Today, I'm making a very scrumptious cake - which (of course) Speculoos and chocolate are involved. I made a combination between Speculoos and dark chocolate cake as filling. The Speculoos is for the base and topping, in between is full of chocolate goodness! -> No-Bake Speculoos "Biscoff" Dark Chocolate Cake"!. So so so so yummy. 


This cake is completely NO-BAKE. You know, it's pretty hot these days... Hmm, not pretty actually. Honestly it's just really bad that the weather is up to 40 degree Celcius today! :( Sometimes I feel like I'm trapped in a small room on the highest floor.


One of the best thing you can do at home is making a delicious no-bake dessert to lift your mood up again. Trust me, it helps!.


If you wanna try this speculoos chocolatey goodness, just follow my recipe below! So easy to make!


Making a 20-23 cm cake pan.

For the Speculoos crust:

Ingredients:

90 gr unsalted butter, melted
250 gr Speculoos "Biscoff/Lotus" biscuits

Directions:

1). Crush the biscuits in a food processor until they became fine crumbs. Leave some pieces for topping and decorating.
2). Stir them with the melted butter, then mix with a spatula until well combined. Tip into the tin/spring form and press down well to cover the base of the tin.
2). Chill for at least 30 minutes to allow the crust to set.

For the dark chocolate filling:

Ingredients:

300 ml heavy cream
2 teaspoons powdered or icing sugar
1 teaspoon vanilla extract
200 gr dark chocolate, melted

Directions:

1). Pour the cream into a large bowl, then add the icing sugar and vanilla extract.
2). Whisk until the mixture forms soft peaks (1-2 minutes), then gradually whisk in the melted chocolate until the mixture thickens (take care not to over-whip the batter!).
3). Spoon the mixture into the chilled biscuit case and spread out. 
4). Cover and chill for at least 5 hours or better overnight, until the filling has completely set.

For the confectioners' frosting and assembling:

Ingredients:

230 grams confectioners' or icing sugar, sifted
113 grams unsalted butter, room temperature
2 tablespoons milk
Speculoos biscuits' crumbs

Directions:

1). In a large bowl, with a hand mixer, beat the butter until smooth and well blended. Beat in the vanilla extract.
2). With the mixer on low speed, gradually beat in the sugar. Scrape down sides of the bowl as needed. Add milk, beat to combine. Then, on high speed, beat frosting until it's light and fluffy and the colour turns out pink (about 5 minutes).
3). Spoon the frosting into a piping bag and decorate the top of the cake (after it's completely set and removed from the fridge), pipe around the edge. Add some biscuits, sprinkle the crumbs over the frosting and a little bit over the cake too), or you can decorate in any other way you fancy!.
4). Done and serve!.

cut a slice...

More pics...

but one slice won't be enough! :p

yummmmyyy!

You can find me on:


Hope you guys have a lovely weekend!
Seize the day!

Lots of love,
@lputriasih